The LifeSherpa Configurator
How to Use It
LifeSherpa Configurator
Set up features and functionality, create/modify and personalize activities and notifications, control privacy and security and more with the LifeSherpa Configurator.
There are two ways to access the Configurator:
Through the Portal at https://lsportal.3rbehavioralsolutions.com/. Click on the Configurator tab at the top. Or directly using this URL/link: https://configurator.lifesherpapp.com/#/login.

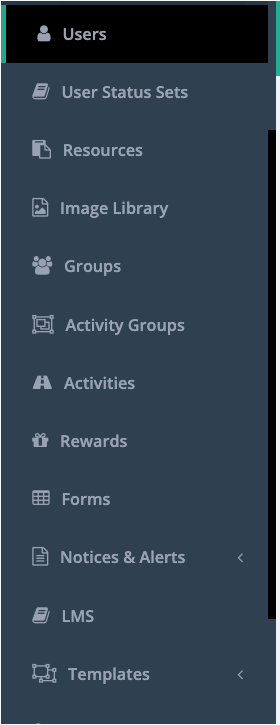
Action Menu
Appears on the left side of the main Configurator page. The options provide access to LifeSherpa’s features and functionality. The Action Menu allows quick and easy management and modification of the settings.
Activities
Access from the Action Menu on the left side of the Configurator screen.
The Activities page shows all the activities the organization has set up. It also includes each Activity’s name, type, Users subscribed, Users active, the number of steps in the Activity, and the Activity ID, and provides the ability to enable/disable the Activity.
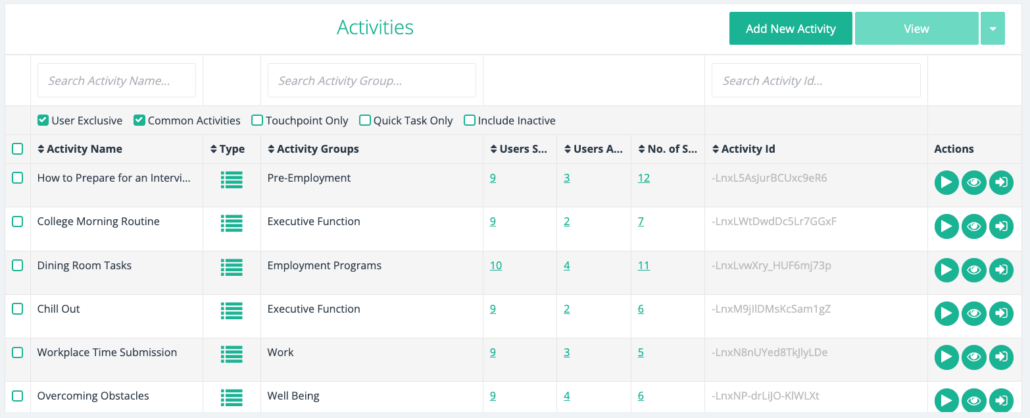
- From the Actions column, view Activities through the green eye button.
- Edit Activity with the green arrow button.
- Add a new Activity with the “Add New Activity” button in the top right corner.
- When selected, a pop-up window opens. Choose the Activity type, either a normal Activity or a quick task and:
- Click Next and choose “Create the Activity from scratch” or “Clone from an existing Activity.” – – Then choose a name for the Activity and click “Add Activity.”
- To delete the new Activity at any time, click the Cancel button in the left corner of the pop-up window.
- From the Activities page, use the click box in front of an Activity to Enable or Disable the activity. Then select the three dot menu on the right and choose the desired option.
The Action Icons
 | The green eye shows Admin everything that is set up in the Activity: title, description, schedule, how long the Activity took each time (start and end time), Confirmation Rewards, if there is a notification of step completion, the position, whether or not the individual has to take a photo when finished, and what the photo message says. It also shows the User all the steps and details that go with the Activity. |
The green arrow goes to page detailing the Activity and the Users connected with the Activity, the Activity Groups, and the Change Log. From the User’s tab: ● Disable/enable Users with the Activity ● Click on the green eye and the green arrow icons to see Users’ profiles and go to an individual User page | |
 | The green person allows the User to make a copy of the Activity for exclusive use. It also takes the User off the original Activity. Prior to executing this action, a pop-up asks for confirmation and provides the option to cancel. |
HOW TO Create Activity / Edit Activity
- From the Activity page, select “Create New Activity” in upper right.
- Select Create from Scratch, Clone from another Activity, or Clone from a Template.
- Indicate whether to create a Quick Task or a Normal Activity:
- Quick Task is a one action Activity and reminder such as Set Status, Take Medication, Timecards Due. There are three types of Quick Tasks.
- Form – Notification and a Form with information and action confirmation answer (note that Form must be created prior to creating this Activity).
- Step – Notification and a single step with an “I Did It” response.
- Status – Reminds User to change/affirm Status.
- Quick Task is a one action Activity and reminder such as Set Status, Take Medication, Timecards Due. There are three types of Quick Tasks.
- Normal Activity is a multiple step Activity with Help, Forms, Timers, Photo Confirmations, and URL links. Examples: Training, Job Process, Life Skills or Exercises.
- Can be Cloned from a similar Activity. All settings stay the same. Choose whether to include Steps, Forms, pictures, and videos.
Create a Quick Task
Enter Title and Description
Choose Form, Status or Step Quick Task:
- Form – Next
Choose Form > Schedule QT > Save
- Status – Next
Schedule QT > Save
- Step – Next
Write in Step Language > Attach Image if desired > Schedule > Save
Set/edit other options:
- Go to Activities page, select Quick Task from list with the Arrow Icon
- Use Pen Icon to the right of Title to open the Activity tabs:
– Notifications – set the notification options desired
– Schedule – change/add schedules
Create/Edit a Normal Activity or TouchPoint
From Scratch
- Title Activity
- Add
Clone Activity or Template
- Choose Activity to Clone
- Title Activity
- Select Steps to keep
- Select Assets to keep
- Add
Set/edit other options
- Go to Activities tab, select Activity from list with the Arrow Icon
- Use Pen Icon to the right of Title to open the Activity Tabs:
GENERAL
- Title
- Alternate Description replaces Listed Schedule
- Description
- Background URL as an Activity image
- Start Button if User can start Activity
- Skip Button if User can Skip certain Steps
- Timer Feature enabled for activity
- Read Titles for every card
- Expected Duration of Activity
- Picture Confirmation and Message
- Activity Type is set at creation
- Position sets placement of Activity in App display
- Type: Form – choose Form
- Image from Library
- Type:
- Form – choose Form
STEPS
Title Verbiage
Course – choose eLearning Course
- General
- Status – Imbed status change in step
- CheckIn – Access if feature is used
- Countdown – must enable if using countdown timer
- Help content and video
- Picture confirmation and Message
- Timer-Step Duration and Countdown Timer
- Reference URL
- Mandatory, cannot Skip if feature is used
- Forms – assign evaluation Forms for end of Activity – Notifications – set the notification options desired – Other – Activity Type List or Flow
- Schedule – change add schedules
- Save in upper right corner when done
Once the Activity is created, add the Activity to an Activity Group and assign Users as required (these are the lower tabs on the Activity page).
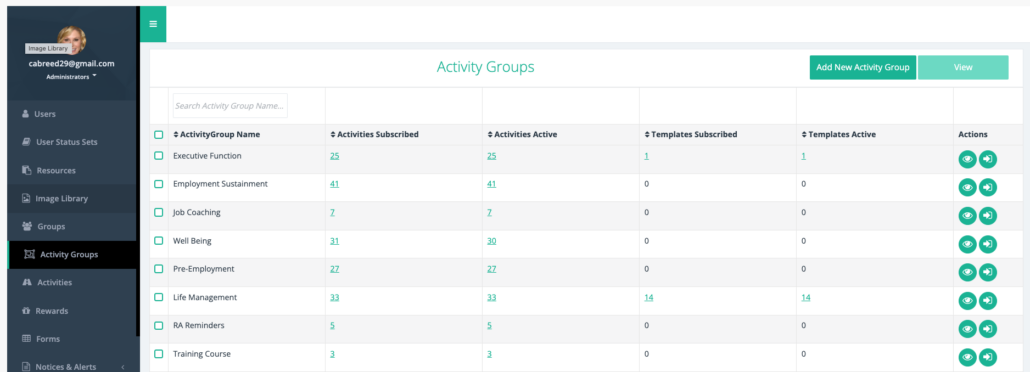
Activity Groups
These Groups are set at the organizational level. They provide a way to filter and sort Activities. The Filter icon on the App home screen allows a Client or Admin to sort an individual’s Activities.
Examples: Job Processes, Self-Management, Work Life.
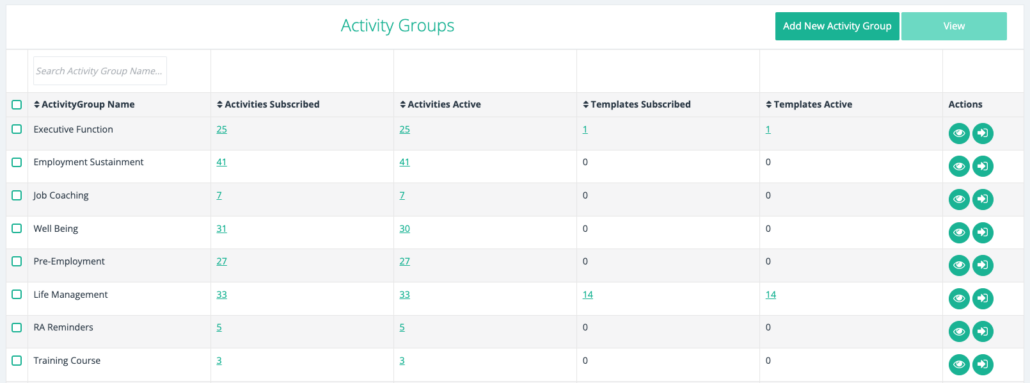
Access from the Action Menu on the left side of the Configurator screen.
Tags are used to sort Activities by Subject or Use. These groups also allow Activities to be sorted by App User as well.
Select Activity Groups for a list of the Activity Groups. Each individual Activity Group can be edited using the Pencil Icon:
- Link/remove Activities or Templates.
- Add new Activity Groups using the New button in the upper left.
Activity - Quick Task
Consists of a:
- Form – A Notification triggers a Form to complete and submit (including Status).
- One Step – A Notification triggers an Activity with one step to complete.
- See Creating a Quick Task
Activity - Touchpoints
- TouchPoints are Activities that you complete about your Client. These activities are assigned on the Client account and are scheduled and visible only to the Admin.
- Touchpoints are used for observations, evaluations, and compliance.
- TouchPoints feed directly into analytics for Client feedback and other reporting around service delivery and Client goal attainment.
- TouchPoints are available under Client Activities.
Activity Timer
Through LifeSherpa data capture, the duration of the Activity and step performance is always tracked.
- To set expected durations for the entire Activity and Step, enable the timer feature and set durations on each step from the Activity set-up tab.
- The expected duration and the actual Client time shows on the Activity Step.
- Reset durations (Admin only) on the App with a ‘long press’ of the Activity for the Client. Countdown Interval is set on each step and shows an active countdown as the step is performed. The Client activates the start button.
- Max Step Timeout controls the period of time that the Client has to perform step and shows expired in When timed out, the Activity advances to next step.
Alerts
Overview
The ability to advise their staff members of changes in the servicing of one of their Clients and to be able to report on who has seen it and when. We have implemented this feature in LifeSherpa where one admin can submit notices about a client to be viewable by other admins. This is like an advanced version of Group Poke feature where we also create resource posts and give UI for tracking who read the post.
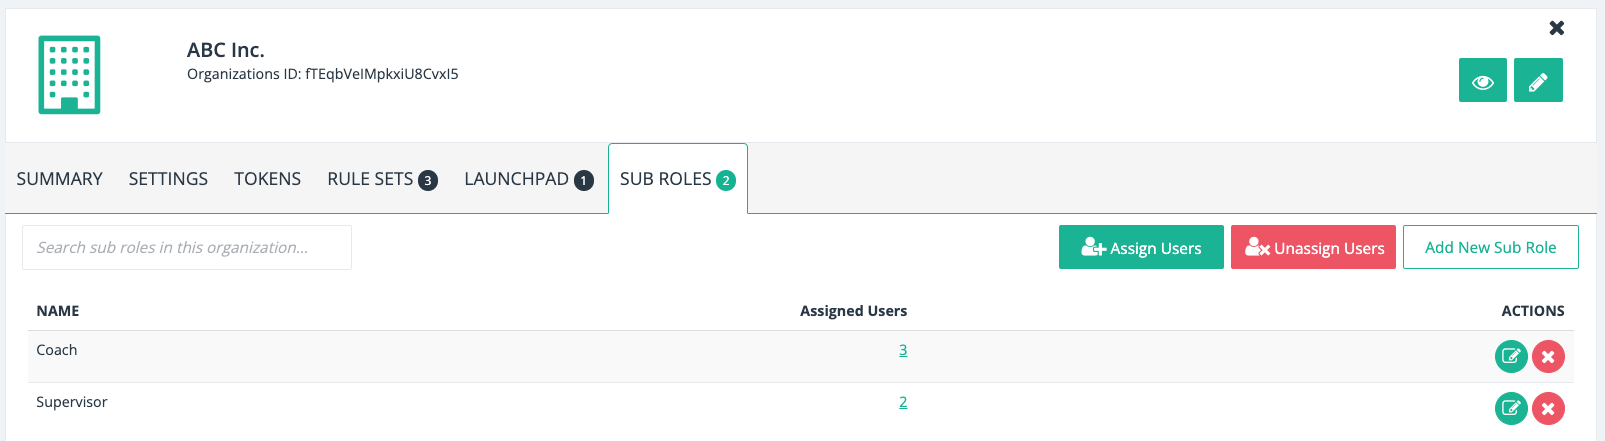
Configure SubRoles
- Login on configurator from Super Admin or Organization Admin
- Go into Organizations and select the desired organization.
- Click on SubRoles tab. From here you can create subroles and assign/unassign subrole to the user.
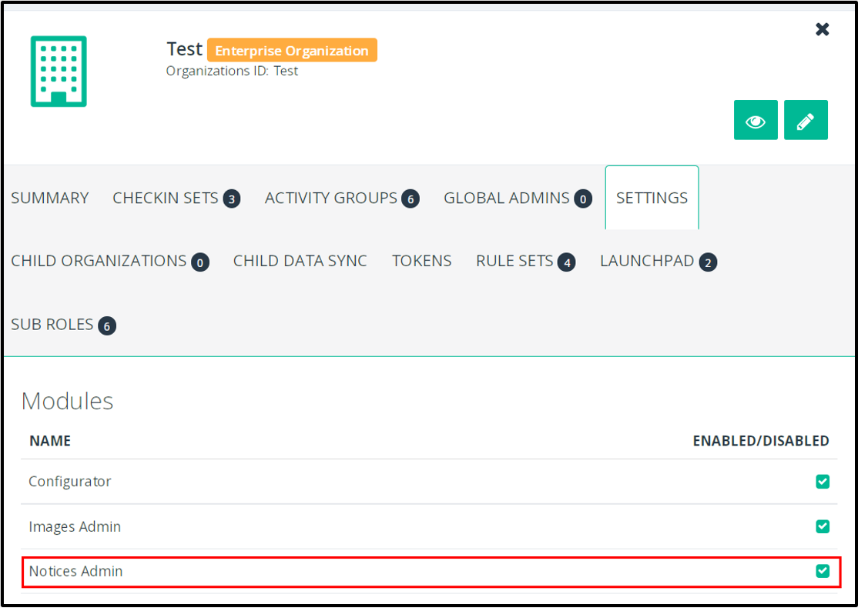
Enable Notices/Alert Feature for Organization
- Login on configurator from Super Admin.
- Go into Organizations and Select the desired organization.
- Click on Settings tab and Select Notices Admin from the list of Modules
- Click on Save button to save the settings.
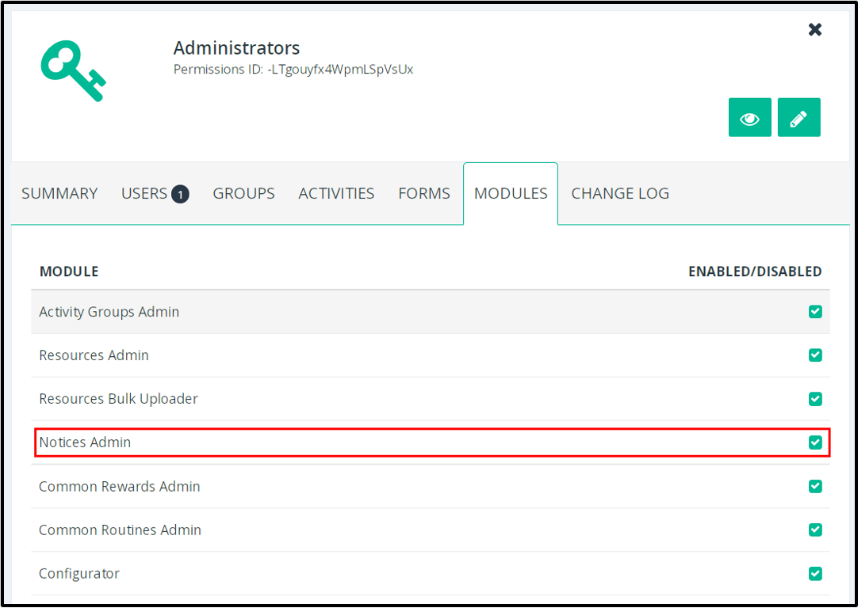
- Now Click on the Permissions menu from left side navbar and select the Administrators group from list of permission groups.
- Click on the Modules tab and enable Notices Admin module and then save the changes. Now this Organization Administrators have full access to configure notices/alerts.
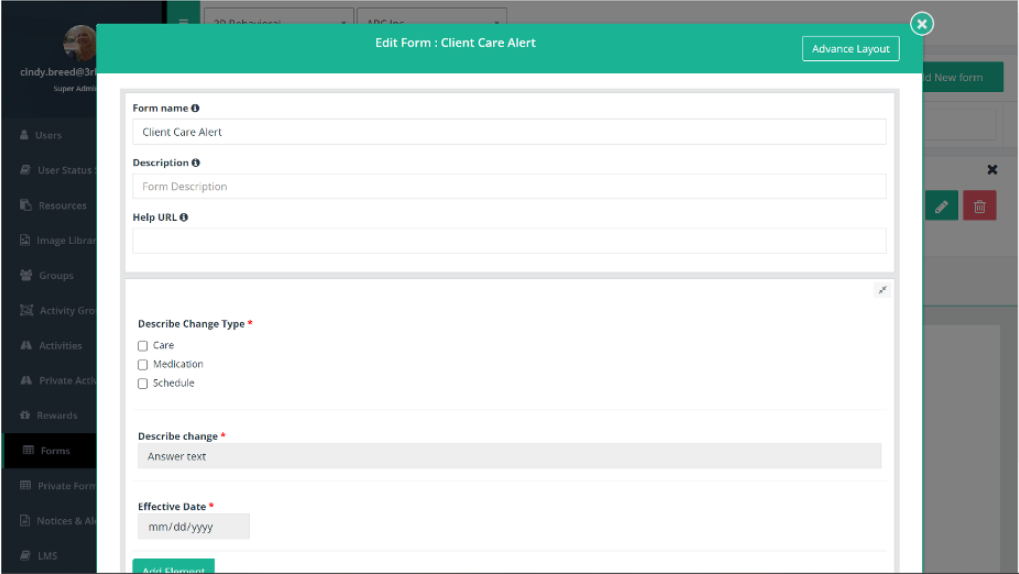
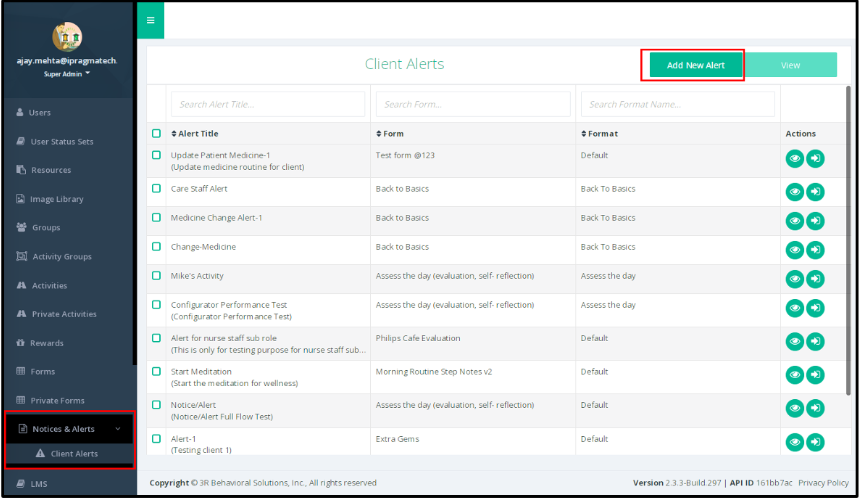
Create Notices/Alerts
- Login on configurator from Super Admin or Organization Admin.
- Create the desired Alert Form for the submitting Administrator to complete.
- Click on Notices/Alerts > Client Alerts from Left navigation bar.
- Click on Add New Alert to create new notice/alert.
Sample Form:

Analytics
- Select Analytics to view General Reports and Dashboards.
- Choose content to display.
- For Help and Training materials, go to: https://www.zoho.com/analytics/video-demo.html
Check-In
Used by Admin to take attendance for such things as events or arrival.
Contact LifeSherpa Support to set up this feature.
- Go to the Check-In page to:
- Apply a CheckIn set to another User.
- See any previous CheckIns, when they were done, and who they were done by.
Circles Confirmation
This feature is for Clients only. It establishes who they may contact via communications and who will receive Notifications. Circle members receive all active Notifications.
Requires an Admin to review and confirm an Activity and fill out an Evaluation Form. This feature is activated by Activity and by selecting Confirmation Rewards of zero or higher. If the value is null, then confirmation is not required. Forms may still be completed through the Activity History on the App.
Communications
In-App communications are completely private video calls and text. Communications are set up for the organization, where as video calling and text are enabled. Either option can be disabled and individual Users may be blocked.
- Users are enabled to initiate video calls when the organization enables the feature by default.
- Under the User Set-up tab called “Communication,” this feature may be disabled for that User.
- Clients can initiate video calls or texts to individuals set up in their Circle via the Help feature.
- From the home menu, Admin can initiate calls.
Admins can contact any person in one of their assigned Groups. Clients can respond to these contacts by video call or text.
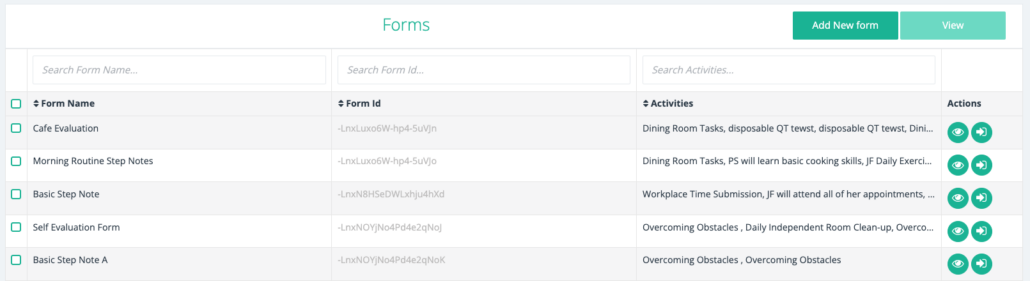
Forms
Forms allow the capture of qualitative information input by the user in a Routine. Forms can be included in steps as well as at the end of a Routine. There are two types of forms, Admin and Client, depending on the type of User and who fills out the form.
Examples: Admin – Poke to Client, Check-In Status, Normal Activity Evaluation Form, Step Notes. Client – Quick Tasks Form, Normal Activity Evaluation Form.
The Forms page shows Forms connected to your organization. The name and ID are shown for each Form.
Tips for Creating
- Shorter and concise gets better results.
- Radio buttons, Thumbs, numbers, or Checkboxes are better for data charting.
- Forms that require scoring or distribution need to be submitted to Support.
- Before creating a Form, lay out the content based on the desired data capture.
- It’s better to clone if copying a similar Form type.
How it Works
- Access from the Action Menu on the left side of the Configurator screen.
- In the Actions column, click on the green eye to view or the green arrow button to modify the Form detail.
- Add a new Form with the green “Add New Form” button in the top right corner.
- Follow the prompts through completion.
Two Types of Forms
User specific – set on a Group or organization level for User Admin (Check-In, Poke, Bonus). Forms are assigned in the appropriate User account under Forms.
Activity specific – designed for a particular Activity to provide qualitative or additional quantitative information.
One Form can be assigned to multiple Activities. Use checkboxes or radio buttons to enable trend and data evaluation. Options include:
- Quick Task – Required for QT creation, design prior to new Activity.
- Self-Evaluation – Client data sheet for normal Activity.
- Admin Evaluation – Admin data sheet for normal Activity.
- Step Notes – Admin ability to comment on specific steps.
- Step Forms – Information provided at the Step level.
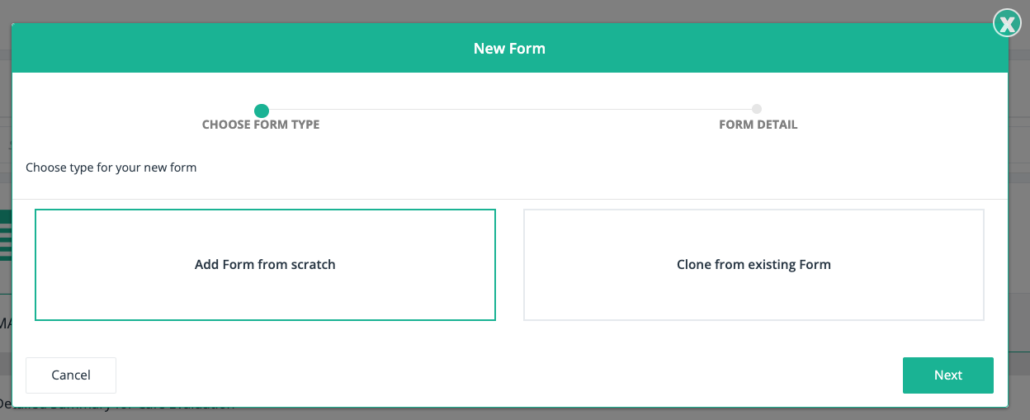
Create A Form
On the Forms page, click the “Add New Form” button.
Select Add a Form from Scratch or Clone an Existing Form.
Provide a name and a description of the Form.
Add Form Help, if desired, as a document, picture, or video.
Click on the “Add Element” button and complete these fields:.
- Question heading – This is the title (i.e., the question being asked for the from to answer) at the head of a section.
- Question text – Not used.
- Placeholder – A short supplemental piece of information.
- Pre-Processor – Check-In, otherwise None.
- Post Processor – Check-In, Poke, Bonus Gems or Reasons, otherwise None.
- Question Type/ Answer Format:
- Radio- single choice.
- Check Box- multiple choice.
- Text- Fill in.
- Number- Quantity.
- Thumb-up or down.
- Spacer – blank (used to add breaks or information only sections to the form).
After Question Type is selected, answer options must be provided for Check Box and Radio.
Select whether a form section is mandatory by checking required box.
Press Update in lower right corner.
Form Reporting
Configurator Set-up
- Resource Collection Folders
- Decide on what categories for Forms reports, examples: “Interview Questions”, “Weekly Reports”, “Evaluations”.
- Go into Resources Tab
- Select Down Arrow (Next to View on top of the Home Page)
- Select Manage Collections
- Type in your Categories
- Activity or Template Form Reports
- As Forms are added to Steps or at the end as Self Evaluation Forms, select the Reporting Tab.
- Turn on Reporting
- Select Client if the Client User will be able to see the Report
- Select Collection for the Report to be posted in
- Save the Activity or Template
- Existing Templates or Activities
- Go to Forms Tab
- Sort Forms by Activities Column
- Open Form
- Select Dependencies
- Go to Activity or Template
- Go into Edit
- Select Step or Form Tab
- Activate Reporting
View on App or Portal
- Select Clients Tab
- Open Desired Client
- Select Resources
- Select Collection Folder
- Open desired Report
- Print or Save PDF of report
Groups
Groups are segmented members of the organization used for oversight on the App and/or data reporting.
Examples: Pods, Departments, Work Groups. Members are Clients with at least one Admin.
An Admin may belong to several Groups and can select the Group on the App to see just those members. If an Admin does not belong to a Group, an individual and/or Client will not be visible on the phone App.
- The Groups page:
- Shows all the Groups in an organization. Groups are used to reflect the organizational structure on its lowest level.
Example: A Coach and Clients or as Reporting elements.
- Indicates what Groups the User is in and how many other people are subscribed to the Group.
- Groups control User visibility on an Admin’s phone or portal. Users can belong to more than one group.
How It Works
- Access Groups from the Action Menu on the left side of the Configurator screen.
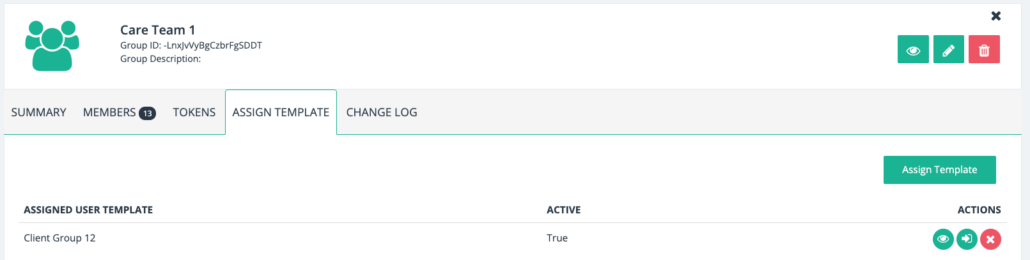
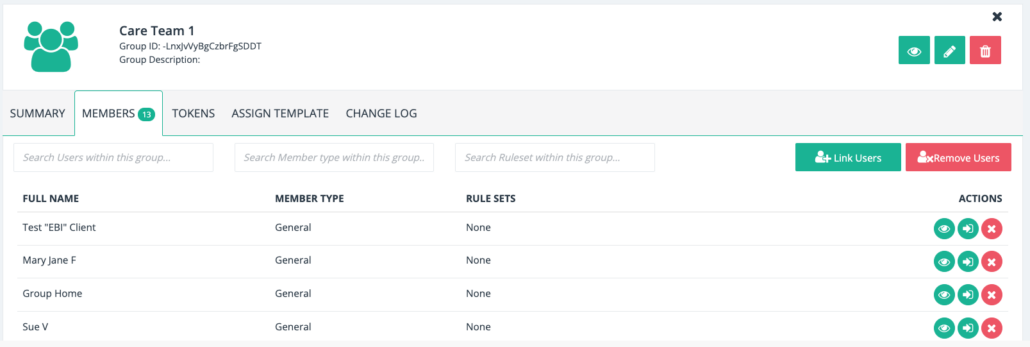
- Click on the Group title to go to the Group’s page for a Summary, Users, Tokens, Templates, and a Change Log.
- On the Group page see the Group title, how many Users are subscribed in the Group, and the Group ID.
- From the Actions column, view the Group through the green eye button. Use the arrow button to get to the Group page and edit and manage Users and other Admin, add, or change a Token, and add a User Template.
- Use the button on the top right to add a new group.
TIPS
- Click on the green Download button in the top right of the page to download the Group page.
- On the right side of each Group row, there are three icons:
- Select the green eye to view the Group and organization name, when it was created, if the Users are switchable, and other members of the Group.
- Select the green arrow to see the Group’s page and edit Users and Admins and review the Change Log and general Group summary.
- Select the red “X” to remove a User from the Group.
Groups Edit - Create Activity Rule
- From the Configurator- Go to Groups
- Select the desired Group
- Select Member Tab
- Select desired Admin and go to Rule Sets
- Add “Create and Edit Rule”
- Select Update
- Repeat for each Group and Admin as needed.
Preview/Assign/Schedule Activities Setup
This feature is now available to all App / Portal Admins Activity Groups
- Located in the Configurator in the left screen selections
- Org Admins should review Activity Groups and ensure that Activities are assigned to the appropriate Groups
- Activity Groups let Admins quickly filter Activities by Type Inactivation of Activities
- Activities that are inactivated for individual Users appear on the List and can be activated and assigned by the App Admin
- Activities that are inactivated for the Organization do not appear on the List and cannot be activated unless an Org Admin does so through the Configurator
- Activities can be created or edited only through the Configurator
- Only Admins with appropriate Permissions can use the Configurator
Help
Help is available in each Step and Form.
Examples: A video or PDF, uploaded from Image Library.
Image Library
Access from the Action Menu on the left side of the Configurator screen.
- The Image Library shows all public and private images in the LifeSherpa Configurator.
- Go to the right side of the page to create a new Private folder to save photos in or delete a folder.
The public files are images available across the Library and available for use by all organizations.
Tips on Video
Each video recording device (phone, video camera, screen recording software, etc.) can record with different settings for resolution, frame rate, audio sampling, compression, etc which can greatly impact the experience you have with using the video within Lifesherpa. The following information is provided in an effort to help you avoid issues which may negatively impact your experience using recorded video within the platform.
Recording your Video
Depending on the device or software (in the case of screen recording) you are using to record your video, there are usually a few settings that can be set for the recording. Below is a description of some of the settings you may see and how you should set them:
Quality / Resolution:
- Set your camera/software to Standard Definition (640 X 320) or the lowest resolution possible.
- This setting is common for most digital video recording devices and software and it is the one setting that has the most impact on the resultant size of your video. It is expressed as the number of pixels for horizontal and vertical. The more pixels the higher the resolution.
- For the use of video in LifeSherpa, we do not need to record high resolution video. Because of the small screen sizes, phone and computer, Standard Resolution (640 X 320) is more than adequate. For a complete description of various resolutions see: https://www.vdocipher.com/blog/video-resolution/.
- The challenge with resolutions is that the higher the resolution the larger the file size of the video file which can subsequently negatively impact playback performance, especially on mobile devices.
Frame Rate (FPS):
- Use 30 or 24 Frames Per Second(FPS)
- Many, but not all, cameras / software allow you to select a frame rate, which is simply the number discrete still images that make up a second of video. Except in very special situations 30 FPS is more than adequate. Using a higher frame rate will greatly increase file size of the video file and subsequently may negatively impact playback performance, especially on mobile devices.
Length of Your Recording:
- Keep your video length to no more than 30 seconds. 15 seconds or less is better.
- Keep your video as short as possible and still convey the concept. People have short attention spans and don’t really want to sit and watch a long help or explanatory video.
Getting your Video into LifeSherpa
Once you have “shot” your video the next step is to get the video into LifeSherpa so you can use it. Uploading Directly From your Phone.
It is possible to upload your video directly from your phone by using the Chrome browser on your phone if you do not need to perform any post processing on your video:
- Open your browser and navigate to https://lsportal.3rbehavioralsolutions.com
- Enter you LifeSherpa username and password
- When the portal open, tap on the Configurator icon
- When the configurator opens, tap the 3 bar icon at the top left and select the Image Library item.
- The Image Library will open and you can select where you want to upload the file from.
- Select the video file and tap upload.
Uploading Directly From your Desktop
If the video file you want to use is on your desktop, you can upload video files into LifeSherpa as follows.
- Open your browser and navigate to https://lsportal.3rbehavioralsolutions.com
- Enter you LifeSherpa username and password
- When the portal open, tap on the Configurator icon
- When the configurator opens, tap the 3 bar icon at the top left and select the Image Library item.
- The Image Library will open and you can select where you want to upload the file from.
- Select the video file and tap upload.
LMS
The Learning Management System (LMS) is available as permitted by the Org Admin. Use the LifeSherpa Portal to access the LMS: https://lsportal.3rbehavioralsolutions.com/.
- From the LMS, view Basic and Advanced LMS eLearning courses.
- Select Add a New Course.
- Assign a Title and Category.
- Save and begin adding Content.
- Assign Course to User in Configurator.
- Build Course into Activity using Configurator.
Main System Login
Access to the LifeSherpa Portal is available through most web browsers, Edge, Chrome, and Firefox. There are some incompatibility issues using Safari. Access the Portal here: https://lsportal.3rbehavioralsolutions.com/.
- The first page the Admin User will see is a login page.
- Admin User must input email and password to access the LifeSherpa portal. The portal provides access to Clients, Activities, Resources, and Courses. It also provides the ability to access the Configurator, LMS, and Analytics directly by enabling permissions to use these modules.
- Access the Configurator using this link/URL: https://configurator.lifesherpapp.com/#/login.
My Activities
This feature is a self-management tool for Clients that enables greater independence. It empowers Clients to set up their own Activities and private routines, be self-reliant, and achieve their goals.
- Activate Private Templates – LifeSherpa will set up 20 Templates for Private Routines around executive function and life skills. – The Org Admin can set up additional Private Templates as required.
- Detailed User Instructions are attached to Private Activities Article in the Client App.
Notifications
These are set-up under User or Activities. There are two types of Notifications:
- User Notifications:
- Client gets notified when Admin confirms an Activity.
- Admin gets Notified every time a Client changes Status.
- Activity Notifications Admin can receive:
- On Start
- On Cancel
- On Decline to Start
- On Completion
- On Step Completion
- On Notification Sent
- Client can receive Rewards earned on Completion.
Organizations (If Authorized)
The Organizations page shows any organizations connected to Admin User account and includes the organization name and ID.
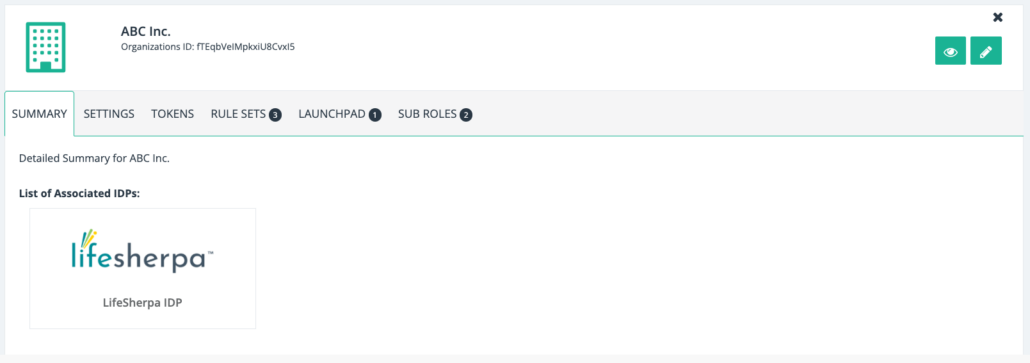
- Access Organizations from the Action Menu on the left side of the Configurator screen.
- From the Actions column, View the Organization detail page via the green eye and green arrow button.
- Activate or remove all features and functions here. Only users with Permission for organizational settings can make changes.
- Through this tab, control video calling, text, and other access.
- Control themes, email visibility, access to the LMS and Image Library here.
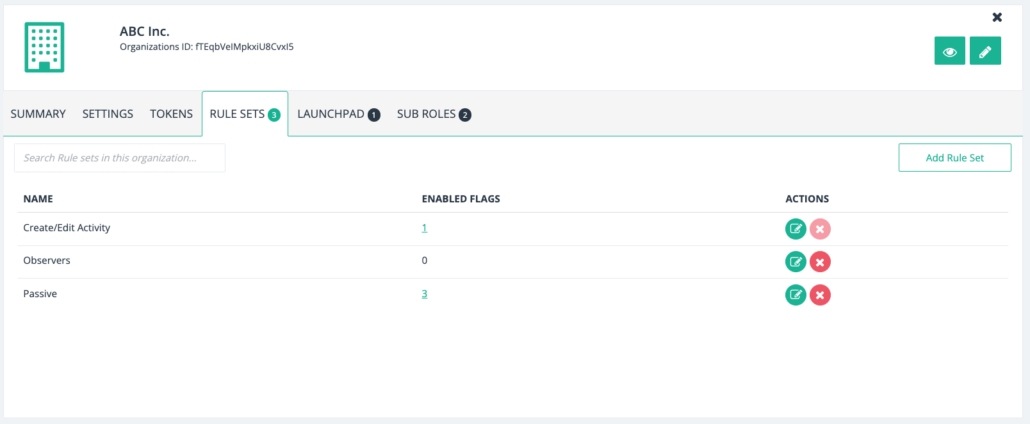
- Set-up Rule Sets by clicking the tab functions to view current setups and select Add to create new Sets.
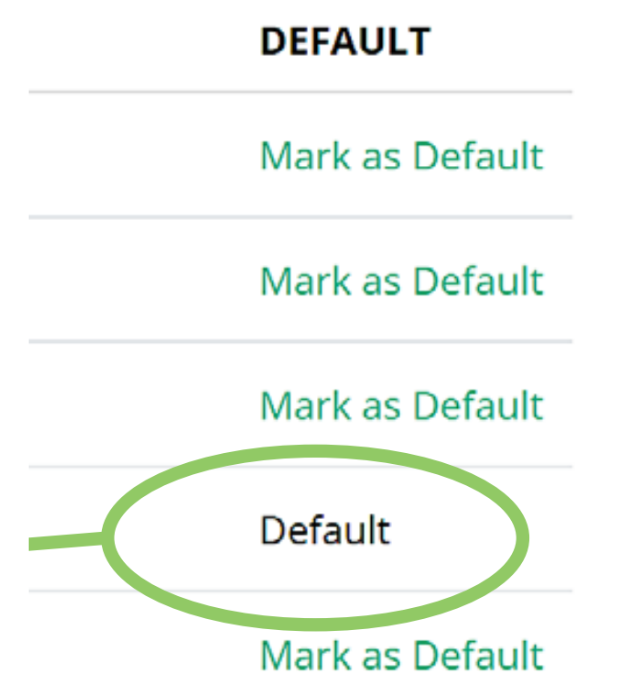
Additional Organization Themes
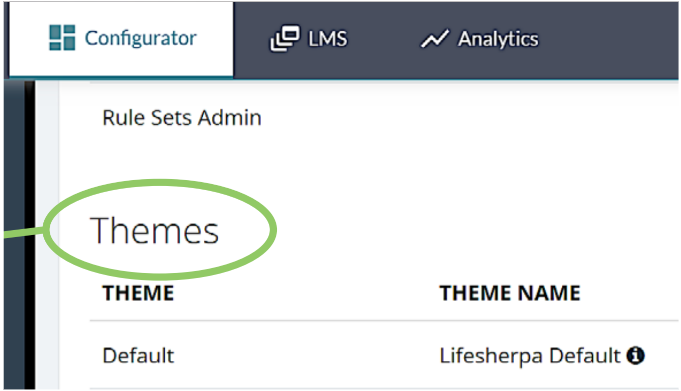
Go to Configurator → Organizations → Settings
Scroll down to Themes and select “Default” or one of the other Themes
The Default Theme is the global Theme
Themes may be changes for individual Users in the User Record under Edit, General Tab
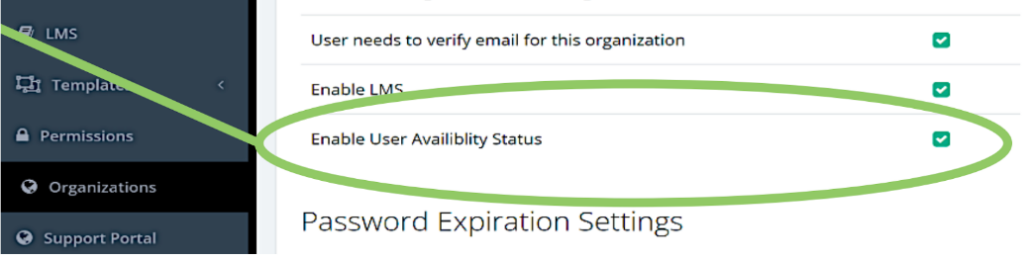
Organization Option - Admin Availability Status
Admin Availability: Org Admin Set-up
- Go to Configurator → Organizations → Settings
- Scroll down to “Enable User Availability Status”
- Click box and save
- All Admins will have this Status turned on by this selection
- Individual Admins can have Status turned off by editing their User record and turning off Show Status
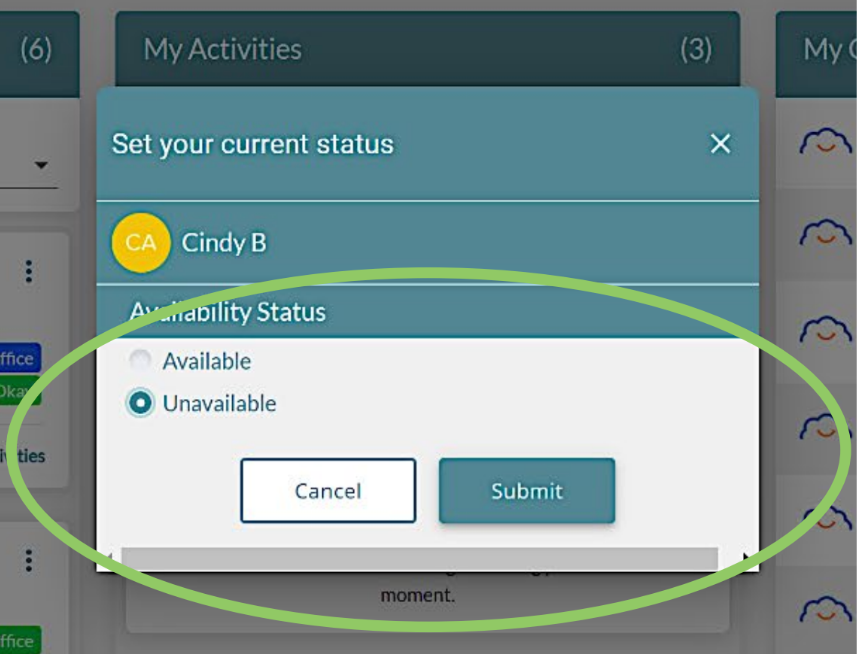
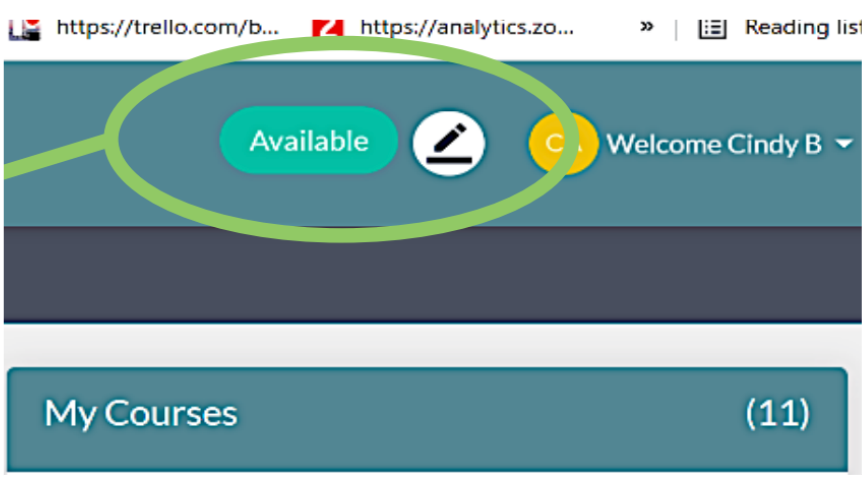
Admin Availability: Admin App and Portal
- Once Activated, Availability shows up as a Status in the right portion of the screen
- By selecting Edit, this status can be changed to Unavailable by the Admin
- When an Admin is “Unavailable” they will receive no notifications, messages, or video calls
- Clients see the Unavailable Status for the Admin wherever the Admin contact is shown in the App. Any attempt to select an Unavailable Admin will produce an informational message
Permissions
Controls which Users have access to the Configurator and what they may create, view, or alter. Admin are set up by access Groups with differing levels of authority. Users and Groups can be viewed only, edited or setup. Groups, Forms, and Activities can have access set up by individual items and the ability to only review, edit or setup those items. Permissions to Forms, Resources, Images, Organization Settings, and Rewards may be restricted as well.
If Authorized
- The Permissions page shows permissions Groups created by the organization.
- Permission Groups control which Admin Users can access the Configurator and what they can view or edit. • The Organization’s Administrator normally sets Permission Groups.
- Groups can have multiple members — all will have the same access.
Example: If one Admin controls Users and Content in Group A and another Admin controls Group B, each Admin must have its own Permissions Group.
- The page also shows the permissions Group name, the number of Users subscribed, and the permissions ID.
How It Works
- Access Permissions from the Action Menu on the left side of the Configurator screen.
- From the Actions column, view the permissions Group detail page via the green eye and green arrow
- From the action column, delete the permissions Group using the red trash button.
- Click on the tabs across the page to add/remove permissions for Groups, Activities, Forms, and Modules. Use the Module tabs on the left Action screen to control what is seen.
Example: If Resources is not selected, it will not be accessible by the Admin in that permission Group.
Each Permissions Group can have its own unique access settings.
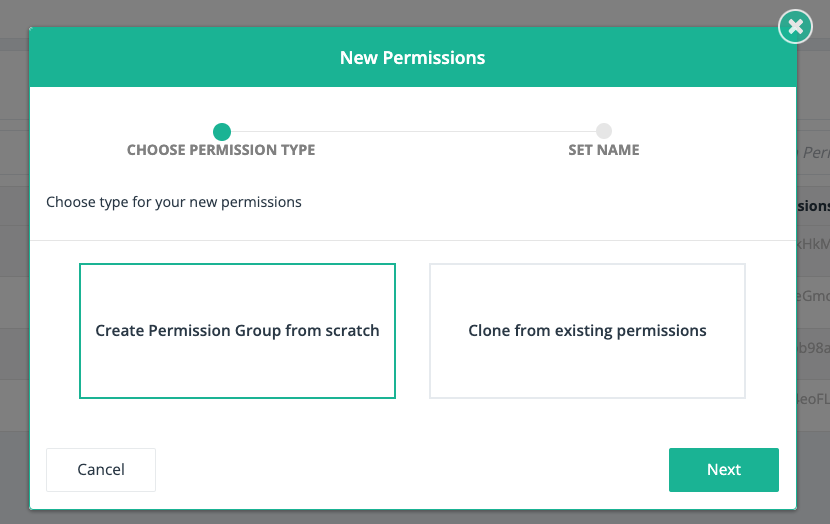
- Add a new permissions Group through the “Add New” button on the top right. When clicked, a pop-up window Choose to Create a Group from scratch or clone from an existing permissions Group.
- Then hit the Next button on the right and set the permissions Group name.
- Next link Users to the Permissions Group.
- Use the tabs to set permissions for the Group.
Permissions for New Admin Access
- Open Configurator
- Look at desired User’s home page and select Permissions Tab. If this tab is empty the User has no permissions to the configurator.
- Select Permissions from the left side of the screen
- Open Administrator Permission Set or Add a new one as required
- Select Users
- Link Users Option on Right
- Select Users
- Save on Main User Screen, Upper Right
Picture Confirmation by Client
An individual/client uses the phone camera to take a picture in accordance with instructions. This feature may be used at the end of the Activity or on individual steps. Admin sees the photo during confirmation or in Activity History.
Resources
Access Resources from the Action Menu on the left side of the Configurator screen. The page shows the Resources Title, Category, Status, the date/time of the Resources were posted, and offers the option to make it a favorite. From Resources, a secondary page shows any Resources posted, the title of the Bulletin, how many Users are subscribed to it, the category, and the ID of the post.
How It Works
In the Actions column, there is a green eye and green arrow icon:
- Use the green eye icon to bring up a pop-up with the details of the Resources.
- Use the green arrow icon to go to a detail page that summarizes the Resources and allows post assignment to Users and Admin.
The top right corner of the Resources page has three green buttons: Add New Post, View, and a down arrow:
- When the Add New Post button is clicked, a pop-up window appears with two options: 1) Add post from scratch or 2) Close from existing post.
- Choose one of these options to proceed.
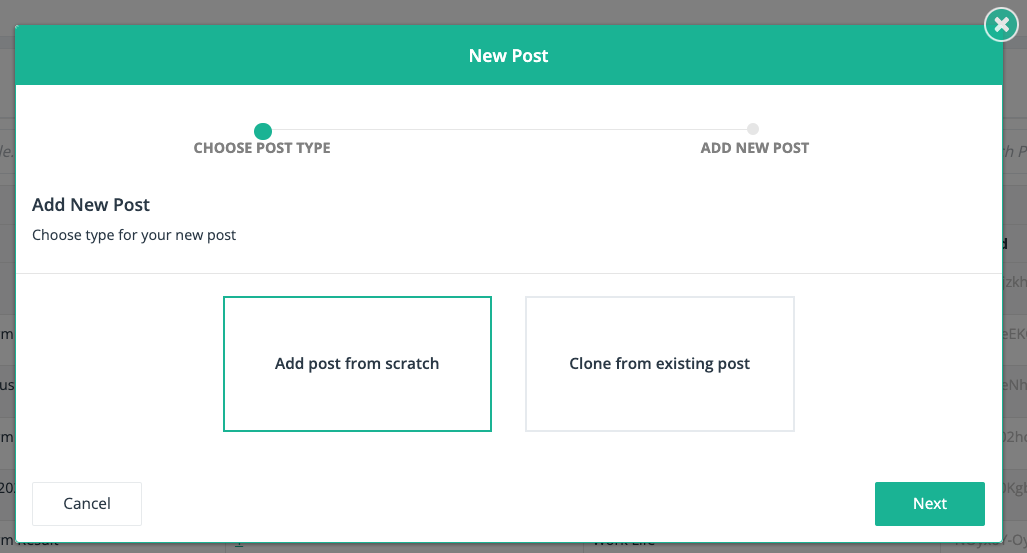
After selecting the Post Type, click the green Next button in the right corner. To cancel, at any point, and not create or add new post, hit the Cancel button in the left corner.
The Next button goes to the Post Detail page. On this page create a title for the post, choose a new or existing category, the post description, attach media if desired, and add any tags to the post for search capability.
- When the post details are complete, hit the Save button in the right corner.
- Use the down arrow button to manage categories or delete a Resource.
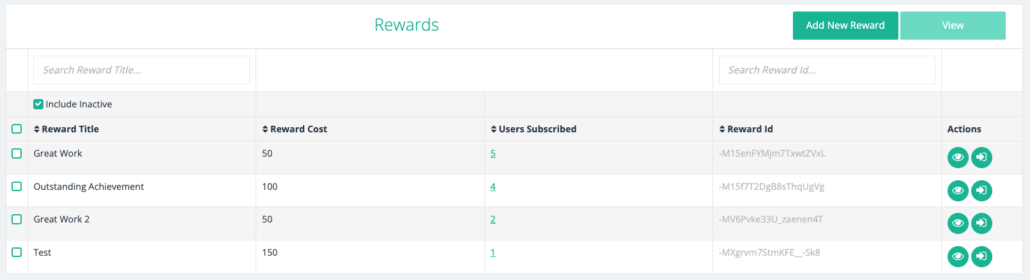
Rewards
Rewards are set up by Activity and include a description, cost, and picture. This information is shown on the Rewards Page along with the title, the User subscribed and the Rewards ID. Rewards have a value upon completion and Admin confirmation. Both values can be used or just one depending on the needs of a Client.
In the App, Rewards are called “Gems” and a client be given additional Gems using a Bonus Form that is set up on the Admin’s User account.
Displayed in the App on the Menu Bar-Rewards:
- Goal – Typically Weekly Gems Earned and set up on User account.
- Balance – Number of cumulative Gems.
- Rewards acquired but not received.
- Rewards acquired.
- Rewards available and how close the Client is to having enough Gems.
How It Works
- Access Rewards from the Action Menu on the left side of the Configurator screen.
- On the Rewards page:
- See Rewards linked with the User profile.
- Enable/disable the Reward.
- Add a new Reward through the green “Add New Reward” button in the right corner.
- View or edit the Reward by selecting the appropriate icon on the right.
- Link Users to the Rewards by using the Edit screen.
Roles
- Client is the Role that responds to or initiates Activities and Status. This is typically an employee, student, or care provider.
- Admin is the role that manages or observes a Client. Typically, there are one or two active Administrators and others observe through Data Dashboards. Admin can be instructors in the LMS, and create and modify courses.
Routines - Normal Types
All have Help features and card face options. There are three normal types:
- Tool – an exercise or resource building Activity.
Examples: Deep breathing sequence, relaxation, building a wellness plan or assessments.
- Activity – an Activity that requires certain steps. Generally, sequential steps use a flow view and non-sequential steps use a list view to allow responding and completing steps in any order.
Examples: Timecards, Work Tasks, Process, Get Ready for Work.
- Personal – Any Activity can be personalized. Once done, it is no longer a general (normal) Activity and only a single individual can use it. Every aspect of the Activity can change. Most typically, steps are added or reduced and the schedule is customized. If several Clients need the same things changed, it is best to clone an existing Activity.
- Learning Tool – a detailed Activity designed to introduce and train. Typically, they have a relatively short duration and are incorporated into Activities as a step.
Skip
Allows a Client to Skip a step without completion. It can be set for Activity but overridden by “Is Mandatory” on an individual step.
Start
Allows a Client to start the Activity. If not specified, the Admin must start or schedule the Activity.
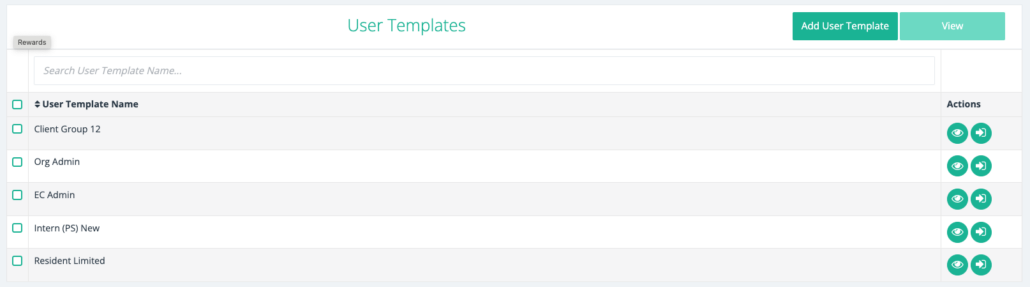
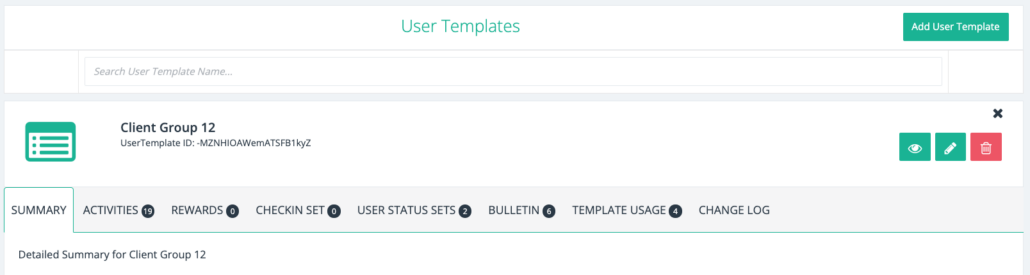
Templates
Templates are standards for Activities or Users for the Organization.
- Access Templates from the Action Menu on the left side of the Configurator screen.
- User Templates are described in Users.
- Activity Templates are created by the Organization Admin for a Library.
- Permits only active Activities in the Activities Tab.
- Create a template from scratch as a new activity or clone from existing Activities here.
- Templates can be flagged as Private. This allows Clients to clone these templates to use in private Routines.
How To Create a User Template
- Select User Templates on the Action Menu, then “Add User Template” in the upper right. Choose
- Create from scratch or Clone from Template.
- Follow the prompts and enter: first name – example trainee, last name – Template, and what type of account (Client or Admin).
- If cloning, indicate what portions of the cloned account to keep.
- Create the account.
- When the account detail page appears, select the edit pencil icon next to the Template name. A list of tabs/fields for editing appear:
- Personal – name and profile picture (note: email account can be changed).
- Circle – other Users that will receive notifications or that a Client can text or call.
- Group – Not Used.
- General- Role, Organization Logo, Show Status on phone, Theme of phone App are all the options to control in this Tab. Other fields relate to Rewards or grandfathered features.
- Autogenerated – completed by system.
- Communication – allow video calling; default is set to allow.
- Forms – Admin-Poke or Client- Bonus Award Form assignment if feature is used.
- Notification- set notification to receive.
- Others – no selection variables.
- Security- no selection variables.
- Update the fields as desired and Save the changes (Save button is in the upper right).
- Remember to update any of the main Tabs for Activities, Status or Resources.
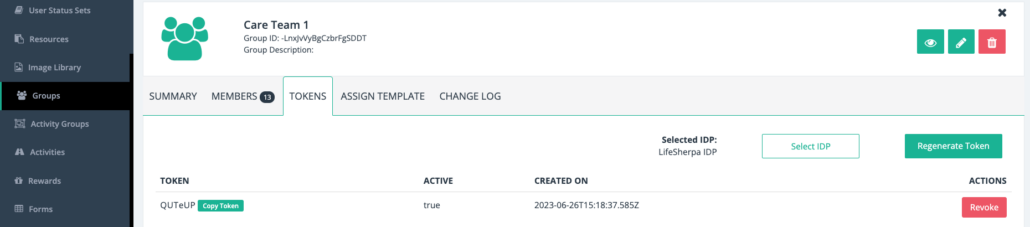
Tokens - Create New Users
Tokens are created/revoked under each Group:
- From the Group page, select the Token Tab, then select Create or Revoke.
- See User Activation for Token Set Up information.
- Tokens create a new user assigned to the group. They are set up and assigned under Groups (as specified on the User Template).
- Users enter their own information and password.
- One token can be used to set up all users of the same type in a Group.
- Group Admin are assigned to the Clients Circle if Applicable.
URL Reference
Allows users to access an embedded URL in a Step and then return to the LifeSherpa App. The complete URL must be specified for each Step.
User Activation
The LifeSherpa App can be downloaded from the Android or Apple App Store. The App requires a minimum of Android 8 or iOS 10 operating systems. A web version will be available soon. There are two ways to activate a new user:
Token Set Up
- User puts in Token provided by Admin.
- User reviews Privacy Policy and Accepts.
- User inputs information and sets password.
- User submits.
- User signs into App.
- User views Getting Started eLearning Activity.
Direct Set Up
- Org Admin sets up User Account.
- Org Admin emails User to set up Password.
- User sets Password.
- User logs in.
- User reviews and accepts Privacy Policy.
- User gets access to App.
- User views Getting Started eLearning Activity.
User Client Attributes
Token
- Basic flow
- Portal to Configurator
- Select Groups
- Select specific Group desired
- Link Admins
- Review/Add Template / modify if necessary**
- Generate Token
- Send Instructions to Client
** Attributes can be added after Account Activation. Admin will receive an email when account is activated.
Template
- Portal to Configurator
- Should Open at Users
- Select Add New User (top right)
- Select Add from Template
- Add General Information (First Name, Last Name, Username, Email, Role)
- Add 7 Attributes (Start Date, Job Title, Commute, Program, Supervisor, Location and Department)
- Select the Template
- Verify Activities, Resources, and Status Sets
- Select Add User
- New User Account is open, Select edit (Pencil Icon on the right)
- Open Circles
- Add Contacts from User List
- Save
- Select Groups and add to the Appropriate Group
- Send an email to User, (Download App or Portal Instructions, Select Forgot Password option.)
- Client will get 2 emails. One to set password and one to verify email account.
- Client needs to open and follow instructions in the emails.
Changing a User’s Attributes
- Portal to Configurator
- Opens to Users
- Select User and go to Detail page.
- Select edit (Pencil Icon)
- Scroll to bottom of screen and enter Attributes.
- Save
Attribute – Set-up, Disable and Editing
- Portal to Configurator
- Select Organization
- Select User Attributes
Set-up
- Select Add in Right corner.
- Add Title
- Add Description
- Add Type (Date, Number, Text, Dropdown)
- Select Required if it is a mandatory field.
Disable
If an Attribute is no longer to be used, use the toggle to disable it. It can be enabled again if needed.
You will be warned if it is being used. Data will be maintained.
Editing
- Select the Edit Icon in the last column for the Attribute you wish to edit.
- You may add Options or modify existing items in Dropdown. You may change Type, Title, or Description.
- Remove or Add Required field.
- Deleting an Option-
- If not required or not being used, simply select Red X to delete.
- If required, you will receive a warning message that all data pertaining to this Option will be removed and which users are assigned to this Attribute Option.
Reporting (Analytics)
Audit Report listing Users without Attributes- This provides a way to ensure that all Attributes are complete.
General
All Users (Clients and Admins) will have Attributes. Including a NA option or Using NA (not applicable) in text fields may be necessary for Admin Users and Attributes with required fields.
User Status
Provides a proactive, passive way for a Client to communicate with their Circle and Admin. A Status, for example, can be used for location, well-being, or work Status. Status may be color coded as a visual aide to the Admin. Status is set up at the organization level but is assigned by the Client. An Organization can have multiple Status options.
- The page shows User Status and the date of that Status
- In the top left corner, there is a white “Schedule Status” button. Click this button to open a pop-up window with a green button, “Add new Schedule” and create future schedules.
- Pick the color of the Status, the start date, time, and if/when to repeat.
- Click one of two buttons under the Actions column:
- The green disk saves the new schedule. Be sure to save if you want the schedule implemented to your User profile.
- The red trash can deletes the new schedule.
- In the top right corner, the white button provides the option to change the User Status set.
- Mid page click the button under Show Status to indicate whether you want others to see User Status.
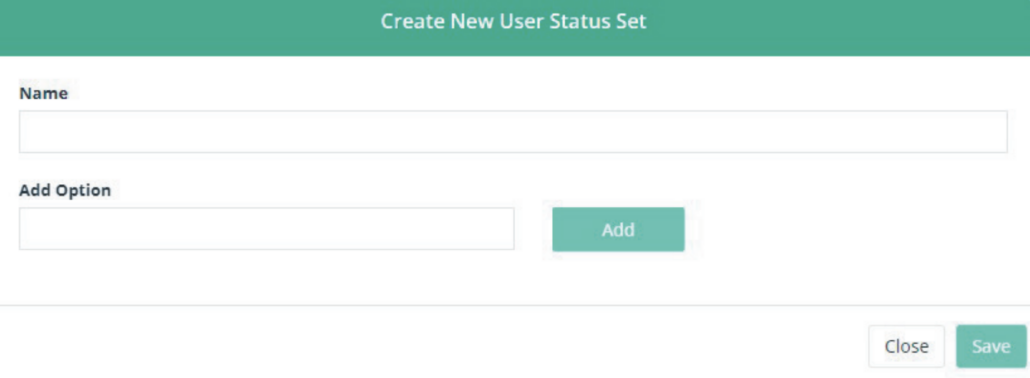
User Status Sets
Access from the Action Menu on the left side of the Configurator screen.
- Unlimited number of Status Sets can be set up.
- Up to 5 unique Sets can be assigned to a User.
- Each set can have multiple answers that are color coded and weighted.
- Status Sets can address location, tasks, assistance, and well-being.
Users
Access from the Action Menu on the left side of the Configurator screen.
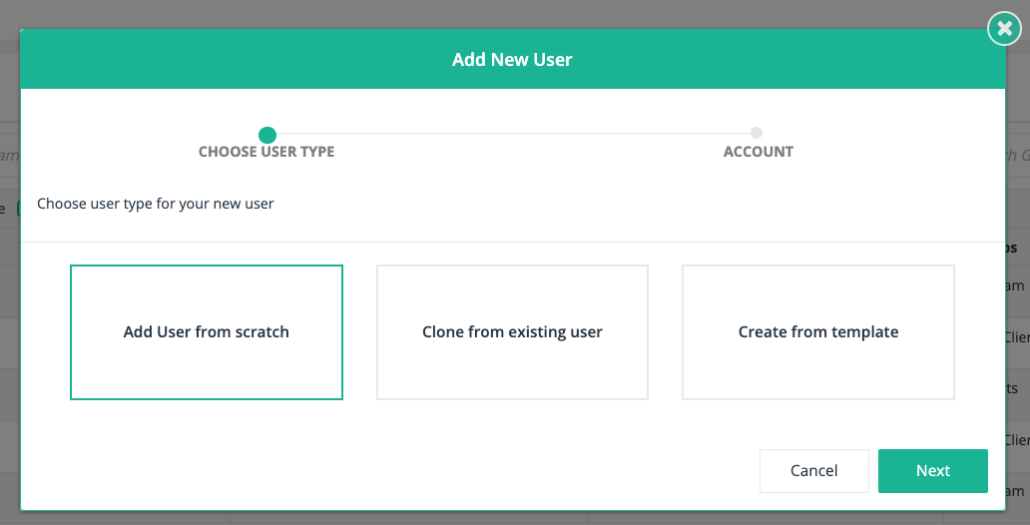
- When the Admin User logs in, the Users page comes up with a list of all the Users in the LifeSherpa Configurator App.
- Click on the Add a New User button in the upper right portion of the page. Choose add user from scratch, clone from an existing user, or create from template.
- To access User information, click on the name to see a page that summarizes the User information, shows any Resources User may have, and any change logs in the User history. The Summary page also provides some information on the User change log.
- To reset a User password for security purposes, click on the green “send password reset email” under Username.
- To access a summary of the User information (first name, last name, organization, phone number, and role), click on the green eye icon on the right side of the screen to open a pop-up of the information.
- To view any change logs in the User history, click on the “change log” tab. This shows any history of a change in the User. For more information about the change log, click on the green eye icon under the word Action. This shows the details of any changes in a previous and current version of the Configurator and who made the change and when.
- To edit information in the User, click on the green pencil icon in the right corner. See options above under Add a New User.
- To reset a User password for security purposes, click on the green “send password reset email” under Username.
- To access a summary of the User information (first name, last name, organization, phone number, and role), click on the green eye icon on the right side of the screen to open a pop-up of the information. To view any change logs in the User history, click on the “change log” tab. This shows any history of a change in the User.
- For more information about the change log, click on the green eye icon under the word Action. This shows the details of any changes in a previous and current version of the Configurator and who made the change and when.
- To edit information in the User, click on the green pencil icon in the right corner. See options above under Add a New User.
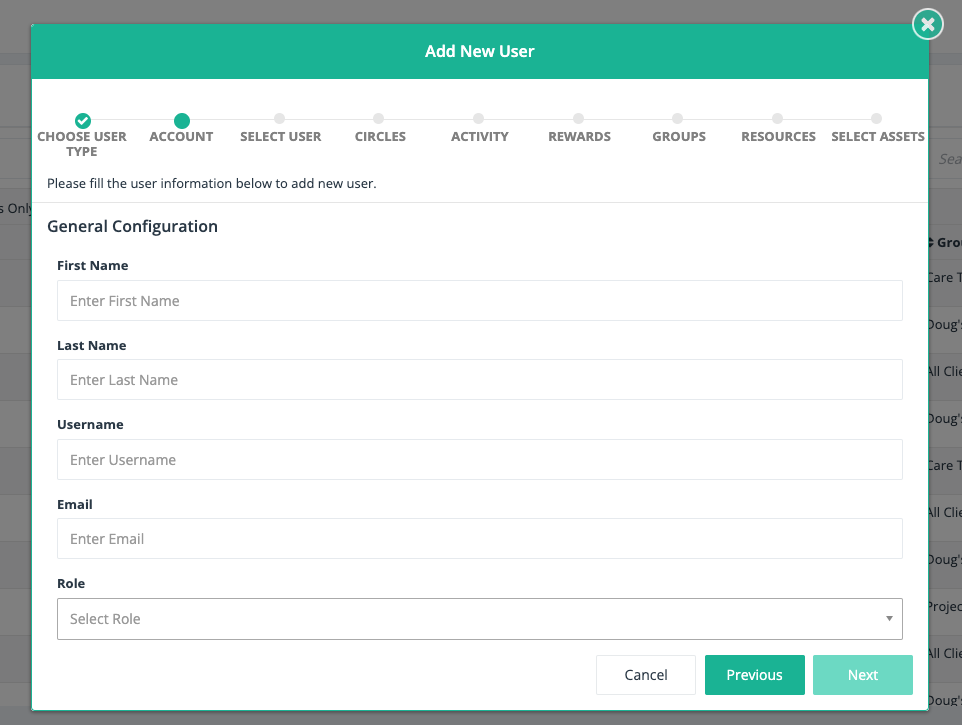
How To Create a New User/ Edit a New User
Go into the Users tab on the left side of the Users screen. In the upper right, select Add New User.
- Choose from three options: Create from scratch, Clone from template, or Clone another User.
- If cloning new Users, prompt will ask what portion of the cloned account to keep.
- Create the account.
- When the account detail page appears, select the edit pencil icon next to the
- A list of tabs specifying fields for editing appears:
- Personal – name and profile picture (note: email account cannot be changed).
- Circle – other Users who will receive notifications or that an individual/client can text or call. • Group – Use Main Page.
- General – Role, Organization Logo, Show Status on phone, Theme of phone App options. control in this Tab. Other fields relate to Rewards or grandfathered features.
- Autogenerated – completed by system.
- Communication – allow video calling; default is set to allow.
- Forms – Admin-Poke or Client-Bonus Award Form assignment if feature is used. • Notification – set notification to receive.
- Others – no selection variables.
- Security – no selection variables.
- Update the fields as desired and Save the changes using the button is in the upper right.
- Additionally, remember to update any of the main Tabs for Activities, Groups, Status or Resources.
- When adding multiple new Users, create the first one as a Template for cloning new Users. Follow the prompts and enter first name, last name, email, password, and what type of account (Client or Admin).